CLICK HERE FOR FREE BLOGGER TEMPLATES, LINK BUTTONS AND MORE! »

Thursday, March 31, 2011

Annabelle meets Bizzy Bec

Hey I'm getting good at these combined challenges lol.

Today I chose to follow the Annabelles Bling Sketch Challenge (ABSC036), and combine it with Bizzy Becs Creatalicious Challenge # 20 which is for anything Two Tone.I chose pink and yellow :)


This is the sketch at Annabelles place this month. They are also searching for DT members, so if your keen, get on over there and have a shot at it.

I have used a free digi from Beccys Place - fluffy cupcake and printed it on photo paper, then used a combination of distress ink (yellow) and Stampin Write marker (pink) to colour it in. The Stampin Write marker didn't like the photo paper too much but it worked out great by giving a fluffy, swirly effect. Beccy has some great images for free, thank you so much Beccy :)

I'll keep this one in my stash to use for a birthday somewhere along the line. Hope you like it.

Wednesday, March 30, 2011

Drunken Mojo Combo

Hi All, that was a catchy heading wasn't it! lol

I have combined two challenges today, the first one being my regular Mojo Monday sketch - this is # 184 (for mojo not me lol) and the second is a themed challenge from the girls at Drunken Stampers for Challenge #60 and it's an "All about Him" challenge for masculine cards.

Here is my take...


this is the Mojo sketch...


I loved doing this card, despite there not being a skerric of ink on the page. I did some sewing and cutting and tying and sticking instead. The paper is from Kaiser - I think it's called Tron or something similar.

My hope in making this card is that my friend Ali has a little boy sometime soon and I can send this card down to her. She hasn't told us what she's having so there's a lot of guessing going on, and she is due any time n
Publish Post
ow. Fingers crossed for her. :)

Sunday, March 27, 2011

A Mother of Pearl Birthday for Mojo

Hello fellow bloggers,

I have finally used the Mother of Pearl paper that I won at Papermates last Christmas.

The other paper I have made with watercolour paper and some shell stamps.

Here it is...


I have embossed the bottom purple card and swiped some ink over the raised bits to make it really stand out. I love this embossing folder, it's from Stampin Up. The ribbon was purchased recently at the Craft Queen and it's all matted on DCWV textured cardstocks. I have also used my spellbinder circles and scallop circles to cut the sentiment. (name dropper I know :)

 This is the sketch I used for Mojo Monday week # 183


Here is a close up of the shells, I have coated them with glitter and they look fabulous! Hopefully it shows up on the screen.


That's all for now, am off to make a very special person a Birthday card, and I'm not gonna blog it. Why you ask? Well because I'll let her blog it of course!

Ciao for now.

Saturday, March 26, 2011

Stampin Up Workshop with Jane Norrish

Hi All,

I had a party today and entertained my friends with a Stampin Up Workshop.

Had a blast and made some stuff while we were at it. Here is what we made, under Jane's expert instruction..


First up was the sweet little bag, it's made using the Fancy Favor Die cut from Crumb Cake cardstock and spritzed with a Stampin Write Marker attached to the Stampin Up spritzer. A little For You sentiment was stamped and punched out for the front and it's tied with twine.


Cute isn't it. I'll be utilising this at Easter and filling it with Cadbury Eggs no doubt - just not sure I'll give it away - may eat those eggs myself! lol

We then made three gorgeous cards, utilising the Stampin Write markers in some way (which is what I had asked Jane to focus on, as I have some markers and am not great with them).

This one uses the markers to colour the stamps - a diffferent colour used here and there, it's very effective and I'm sure I'll be using that technique again.

The next one was coloured the same way, but then the stamp is sprayed very lightly with water prior to stamping it on the paper. This makes the stamp have more of a water colour image.


And last but not least, we stamped a black image with Staz On and coloured it with the markers and then used a blender pen to spread the colour around and blend it together. Another technique I like, however, I'll need some practice at this one.


Almost all of the products and tools used above are from Stampin Up of course!
If you live on the Gold Coast, Queensland, Australia and would like a Stampin Up Workshop of your own, I suggest you contact Jane through her blog - website  and tell her I sent you :)

That's it folks, have had a lovely day, am now exhausted!


Sunday, March 20, 2011

Flower Friend

I took delivery of the Tattered Florals die by Tim Holtz which I'm sure you are all familiar with, and that I am very pleased to now own. So I have been going mental making flowers. The one on this card was inspired by a lady on you tube that does THIS tutorial for making a similar flower.

Here is my card...


I love the sentiment from the Stampin Up set "The Nicest Things" and thought it would go well on a tag for the challenge at Annabelle Stamps - "Say it with Tag".

The background is papers from the Kaiser "Utopia" collection 6" paper pad, and I've simply torn stips and rolled back the edges, highlighting them with a little Tangerine Tango ink to match in with the card base.

This is such a bright, flowery card that I thought it would suit the challenges at both the Scrapbook Sisters Spring Flowers challenge and the Southern Girls Flowers Challenge .

Hope you like it too. Keep an eye out for more of those gorgeous Tim Holtz flowers in the future. I'd also like to thank Nicole at the Craft Queen shop for the beautiful torquise ribbon on this card. I had ordered other ribbons from her and they arrived beautifully packaged and tied up with this ribbon. It's always the way isn't it, the one you didn't choose is the first one you use!

A Clean and Simple Hello

Hello hello hello,

A quick share of my take on the Clean & Simple FTL132 Challenge this week. It's just for fun, but it goes perfectly with a stamp set that arrived from The Craft Queen this week. This is a Fontwerks stamp set and I just love it, especially as it was half price in the clearance section of their website! Can't go past that.

Here's my card....


and here's the sketch....
 

Love the Clean and Simple concept for a quick make card. 

Some Soft Suede and Tempting Torqoise ink a little cardstock and a slip of dotty paper - done!

Sunday Challenge Fun..

Hello Everyone,

I was having a quiet Sunday today with hubby sick in bed (awww), and thought I'd do a couple of challenges.

The first card I made is this one...


Sometimes it's easier when someone else tells you what colours to use, today I used the colours suggested by Just Add Ink in the JAI60 colour combo 
I just happened to have those colours (almost anyway - my crumb cake is a generic one but pretty close).

It then gets easier again when you follow a sketch, this one was from Crafty Ann's, Challenge #36.
I like the simplicity of this sketch and it gave me an opportunity to try out my new spellbinder circles dies. yipee.

Here's the sketch 

The stamp in my image is a favourite from Penny Black, I used my Stampin Up Stamp-a-ma-jig to line up the images and did some masking to stamp over each other.The brads (which matched colours perfectly I thought), were a discount buy from Kaiser Craft. I think I've mentioned this bargain buy before lol. I've done some embossing in one corner and stamped my sentiment in the other on the bottom panel which is revealed by cutting a hole in the top layer.

Hope you like it :)

There are a couple more posts coming today, so keep an eye out for them.


Thursday, March 17, 2011

An Easter Cutie

Hello again,

I made this card for Easter and because I had the die cuts laying around since Trish bought the die last year and we had to try it out then and there...lol just getting around to it now. I thought I'd share it with you all because Easter is just around the corner.


(Sorry for the awful photo, always find it difficult to take photo's at night. )

I have used some colour co-ordinated twine for the whiskers and my favourite little googledy eyes. Just a simple card, it sure as heck don't beat chocolate eggs though. mmmmm can't wait for the annual Easter stuff your face with Chocolate tradition!

Wednesday, March 16, 2011

Owl Punch Flower Addiction!

Hello again....just wanted to show off the cards I made featuring the Owl Punch flowers that i made at Trish's place the other day.  They are so lovely - i used Kaiser papers from the Utopia collection along with my new spellbinder scallop circle dies and dry embossing embellished with glitter and ribbons.

The first one here is Happy Birthday and I used a Sketch from the 107 challenge at corrosive challenges.


I used the de embossed side of the paper to lay the glitter into the crevices of the pattern on the bottom half of the card. 

The second card is actually the first one I made - constructed at Trish's place on Sunday while Roz, Trish & I had a chat. 

The sentiment is stamped onto a die cut tag - bosskut brand and the ribbon is actually from my wedding invitations. Ironically my 4 year anniversary is tomorrow (17th - yes I got married on St Patricks day - and yes the bridesmaids dresses were green, as were the mens Ties! lol)


The embossing folder used above was the Stampin Up - elegant soiree folder and the papers are still Kaiser from the Utopia collection. Cream cardstock is Stampin Up too. I've used a keyring to attach the sentiment to the ribbon and inked the edges all round with green.

Since it is green I would like to enter this card into the challenges at both the Stamp Fairy Challenge and ecp challenges #33 because they are looking for Green.

Mojo Flower Fold

Hello Everyone,

I am on the ball this week - my mojo is complete - and some!

I had a lot of fun making this flower that my friend Trish taught to me - and she has cased it from somewhere else, so whoever was responsible - thank  you, I love it! It was made with her Owl punch from Stampin Up (am gonna have to get me one of those, along with everything else in that catalogue!!! lol)


I have used the Mojo Monday #182   sketch and whilst my ribbon is twine and doesn't go all the way across, I think all the other elements are represented in my card.


I have really enjoyed making the flower and have made a couple more than this one too - and I'll post them shortly. I had also been dying to use the little letter beads that I found in a discount store somewhere, the Twine (also a discount store purchase) is perfect for threading them on. The embossing folder I used is a cuttlebug on, but I can't remember the name - as usual.

I'd also like to enter this card into the all tied up twine challenge at the cuttlebug spot, because it fits this card perfectly requiring twine and dry embossing.

Friday, March 11, 2011

Never Ending Goodbye

Hello Everybody,

My lack of time this week leads me to post something that I made quite some time ago and that my good friend Trish had taken photos of because she liked it so very much.

It's a never ending card and I learnt the technique off You Tube. Sorry I don't have the original post, but if you type in never ending card all sorts of tutorials should come up for you.

I was reminded of this card by Robbie Rubala of Inkedx2 when she posted one a month or so ago, you can see her version here .

On with the photos then...


 I made this card for a work mate who was retiring after 20 years of service.

I have used my Friendly Words jumbo roller and my Fiskars cutter and letters-1 template to make the sentiment. 

This is the front and it folds open to reveal....


.....The first lot of panels (we were all able to write on a different panel each), it then folds upwards from the middle....

....and it keeps going, it simply folds out and around up and over endlessly...


It's a fantastic design and has endless options for decorating. I've also used my stampin up punch, some ribbons, pearls and decorative corner stamps. I don't remember the name of the patterned paper I used which is frustrating as usual.


...and then back out again....

......from here it folds back to the front view.

I feel better now that I've shared something for the week. I am hoping to get out into my craft room today after Gym so hopefully will get my Mojo card for the week done at the very least!

Thursday, March 10, 2011

Finally - A Flower!

Hi Everyone,

I have had a really busy week and haven't had time to make anything at all, which totally sucks as I have ideas running around my head and if I don't create something soon I'll go mad!!! There's always tomorrow I suppose.

In the meantime, I thought I'd share with you this wonderful flower that finally came out on my cactus.


I have been waiting for FOUR YEARS for this baby to have a flower! Finally, last month, I had three flowers begin to grow, but with all the rain - they wilted and died before opening.

At least I thought they did.

The other night, I was outside with the dog and I realised that the cactus had another flower on it and this time it was open. I'd given up on checking it each morning - turns out it opens up at night!

What a cheeky plant!

Saturday, March 5, 2011

Papermates - March 2011

Hello Everyone,

I have been slack and still haven't finished my third Spesch Stamps card - even after a full day at papercrafting, I guess there was just too much else going on at papermates today. Which is why I am here tonight - blogging! (and I had to beat my friend Trish to the post for a change - man that girl is organised!)

Today we had Amanda Cordingley - a Kaszazz rep (did I spell that right?) - do a make and take for us. Always a bit of fun. We made a beautiful paper flower - which I stuck to the front of the card I made today, and we also made a lovely card.

Here is the card Amanda organised for us:-


It really is quite pretty. The background was embossed and sponged over with distress inks. The tag was was also sponged over with distress inks after stamping the sentiment. The butterfly was stamped, cut out and coloured in with a water brush and some more distress inks. I love it.

The card I made was a bit of an experiment and there are quite a few things I would change when doing the next one - the size for instance! lol. This one turned out a bit large :) It is a slider card and I love the concept, but will be playing with a template for this type of card I think before making it again.


Note Amanda's flower stuck to the front.Oh, and the pull / hold tabs are my spellbinder Labels die. As usual I can't remember which number labels they are!


This flower is so very easy to make. Simply torn paper, curled with a wooden skewer and stuck together with a little punched flower and bling. Very effective.

Anyway, that's it for today. Hope you like the products of my day.

Tuesday, March 1, 2011

Get Well Soon Set of Four!

Hello again,

I told you I'd had a wonderful un-interupted day of crafting! lol.

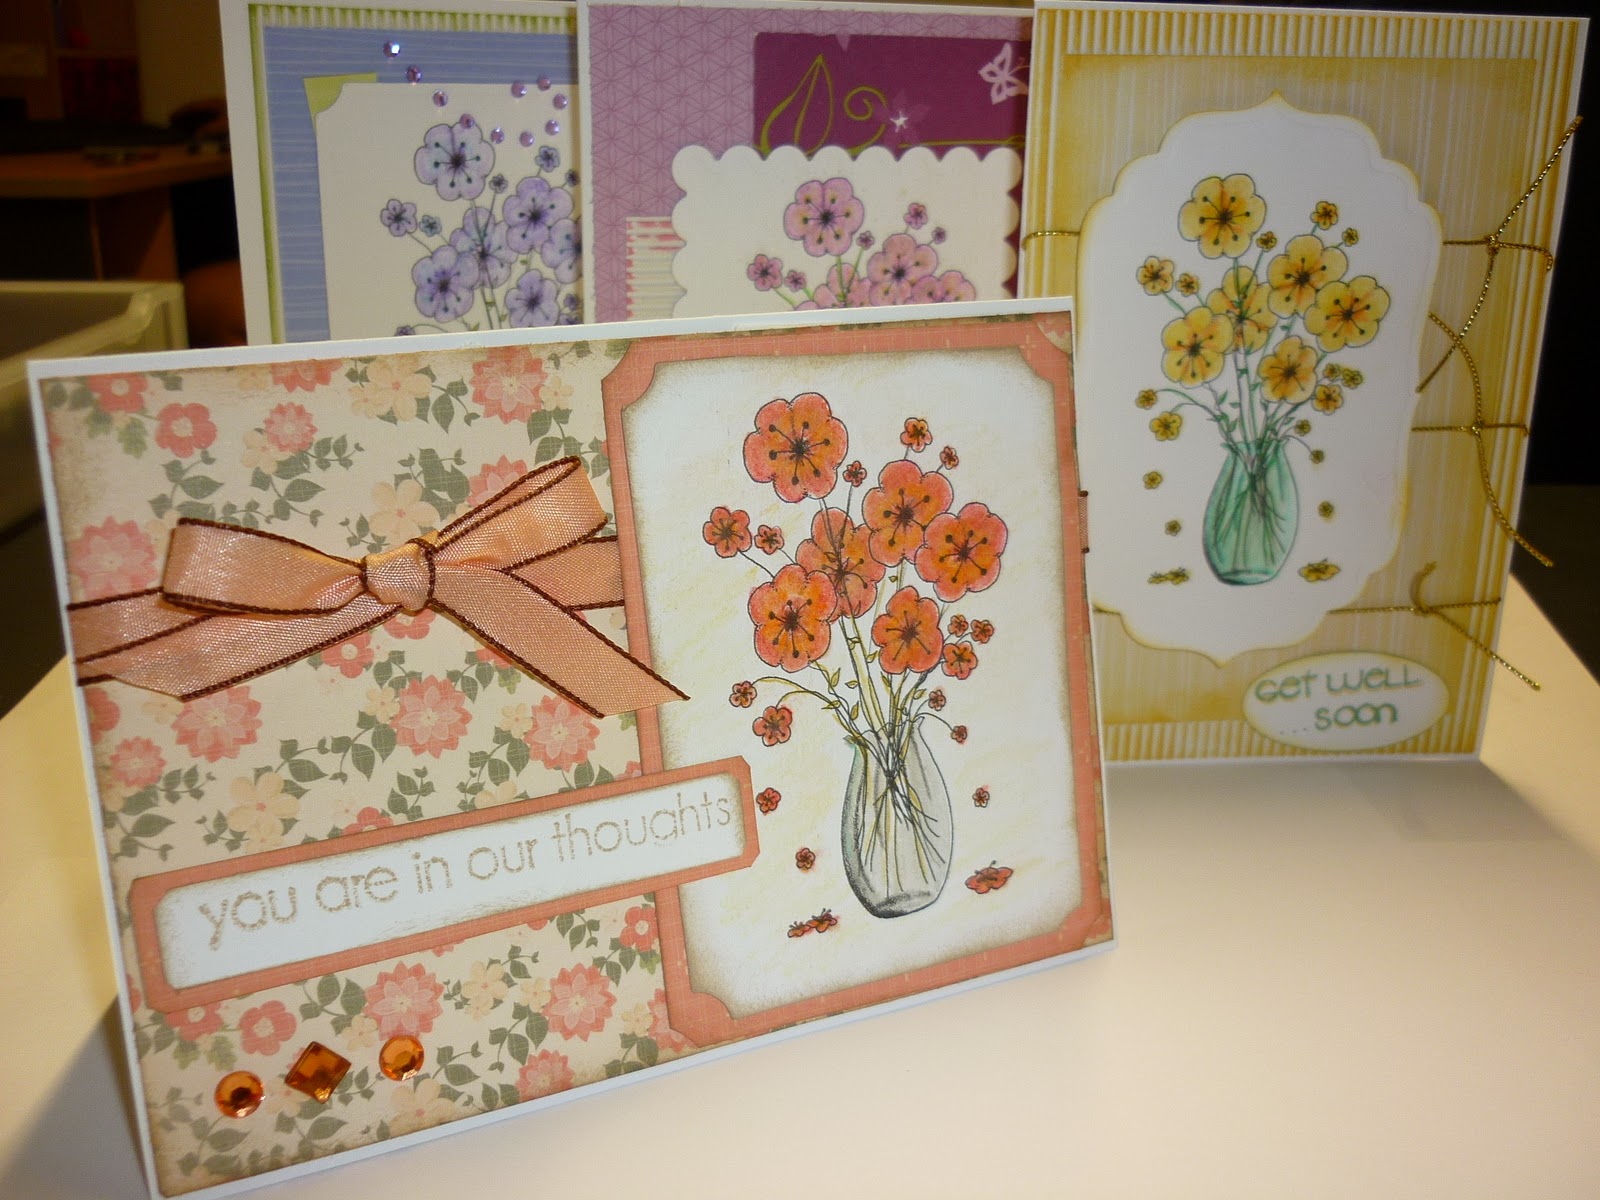
My Third Spesch Designer Stamp is going to have to wait, it's been beaten to the post by a set of four, yes that's right - FOUR - pretty get well soon cards. I think they would cheer me up if I were not feeling well.


I had printed this image (It was an internet freebie) four times on one sheet of white card and sat down to colour them in. I did four different colours to see what effect it would have and I loved all of them. A couple of them even have shimmery perfect pearls added to them. 
I have used water colour pencils to colour them and blended the colours with a Stampin Up blender pen. I'm not sure if you're supposed to use the blender pen with pencils, but I find it is an easier to control medium than using a water brush.

Here are some individual photos to show each one off.


I've possibly gone a little overboard with the rhinestone flourishes on this one, but I was having fun.

The paper is  DCWV scrapbooking stack and I've used corrugated board swiped with ink underneath.


 The butterfly on the paper inspired me to make a butterfly and It kinda evens up the layout a little.

The paper here is from Stampin Up and is one of my favourites.


 Perfect pearls on the flowers make them shine.


All the flowers are coloured with water colour pencils and the Stampin Up blender pen. I used a Versa Marker pen to ad spots that the perfect pearls would stick to and then spritzed it with a mini mister of water to set the powder.


I love the gold twine on this one.

It's also DCWV paper - the yellow in the same pack.

The sentiments I've used are from Kaiser - The Get Well Soon mini clear stamp set.

I actually stamped it in a lighter colour and then went over it with a marker to get the colours I wanted.


 This peach coloured card is my favourite.
The paper is from Kaiser and that's the last of the set that I bought. boo hoo. 
The ribbon from my stash matched perfectly, as did the little gemstones. That doesn't happen too often! 

I have also distressed some of the edges with ink on almost all of the cards, sometimes on the corrugations and other times around the frames - mostly Stampin Up colours.


Time out for some Mojo

Hi Everyone,

I have had a wonderful day at home today with hubby away working in Brisbane and no interuptions meant that firstly my Mojo was a great deal of fun to do, and secondly, I got more than just my Mojo finished today! Will post more a little later when I've finished the set :)

I had three new stamps from Spesch Designer Stamps arrive last week and I've used one of them here, (and one on the last post) and hopefully, the final one on the next post too :)

Here is my submission today for the Mojo Monday #180...


The papers came from my stash and are a mish mash of Kaiser (the white one), DCWV Endless Summer ( the green one) and from a DCWV scrapbooking paper block (The pink polka dotted one).

The big flower brad was found on special at Kaiser yesterday - 50cents for a pack - I bought 6 packs! They have about 12 small square brads and 3 big round or square in each packet. That should go in for bargain of the week somewhere I think!

I love the little googly eyes on the rabbit, have been dying to use them, another bargain and I'm sure I have enough of them to do 200 bunny rabbits! 

The little girl - "Bonnie" - is coloured with a combination of copics, stampin write markers, blender pen and water pencils.

The gorgeous little paper roses were found at the ribbon lady at my local flea market.

This card is going in the post this week to my God-son's sister Lily, who fell off the monkey bars last week and broke her arm in two places! I hope it helps her feel a little better.